Bruising Techniques


A character has a fight on stage! Now they walk around looking... fine? While theatrical productions often have the ability to discard some aspects of realism in favor of speed or cohesion, sometimes it's nice to add a few extra touches. One simple touch is brusing. From a slightly reddened cheek to a full-force, Fight Club-esque medley of bruises, adding bruises can be an excellent way to sell the onstage violence.
So, how do we turn makeup into bruises? The first step is to determine what kind of bruise you would like to create. Old bruises typically have a yellow and greenish color. Fresh bruises are often bright shades of red. However, there is a long stage between the two aforementioned color palettes: the purple/blue/black stage. So, when preparing to apply bruise makeup on an actor, it is important to consider what color palette will be appropirate visually and canonically. It may be useful to research reference images to determine the ideal color palette for your performer.
Next, find the right paint. Remember that the visual effects of bruising should be visible to the audience from a distance, so powders and alcohol paints are not preferred materials. While water-activated paints can be used, they have a greater chance of smudging and running from sweat, so they should only be used if the bruising needs to be removed quickly. Creme paints are preferred due to their consistency, pigment, and ability to be powdered dry. Ben Nye has several bruising kits available in a variety of colors.
- Master Bruise Wheel (EW-4)
- Pro Bruise Wheel (EW-1)
- Bruise and Abrasions Wheel (EW-41)
- Pro Cuts and Bruises Wheel (EW-3)
- Bruises Wheel (CK-1)
- Cuts and Bruises Wheel (CK-3)
- Bruise and Abrasions Wheel (CK-4)
Once you have the paint that you would like to use, begin the application process by picking pieces out of a wedge sponge. This will create an uneven texture that will help the bruise appear more realistic. Dip the uneven side of the sponge into the paint. Dab it against the skin where you would like the bruise to appear. Continue dipping the sponge into the original and accent colors for the bruise. The key to an excellent bruise application is lots of layers. Concentrate the darkest colors in the center, and allow all the colors to dispurse unevenly. If the bruise is placed on a bone, consider how the bone would cause the blood to pool and bruise beneath the skin. Broken capillaries can be emulated with a stipple sponge. It is not necessary to create broken capillaries solely for stage productions because they will not be visible. However, they are excellent visual details for close-up, promotional photos. Obtain reference images if you are struggling with coloration or placement. Finally, set the paint with translucent setting powder. You should now have an impressive bruise!
Starvation Techniques
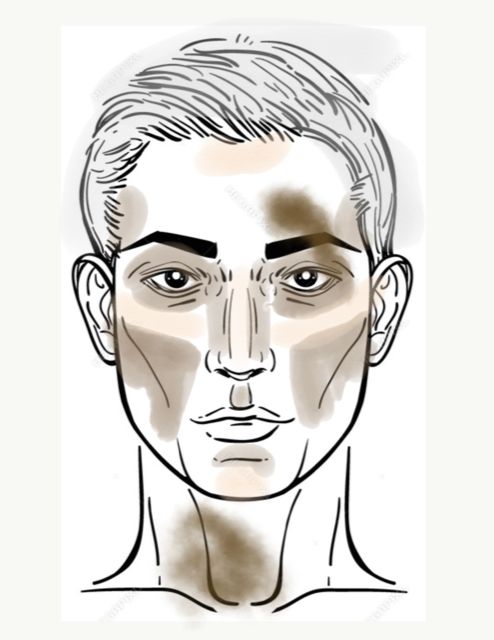
Your character is struggling to find food. Perhaps they are an impoverished Newsie. Perhaps they are an unfortunate citizen of Urinetown. Regardless, they need to look like they're starving. How do we do that? The key is contouring! When people starve, hollows of their faces sink in. So, the best way to make a character look like they're starving is to darken the hollows of the face more intensely. This includes the temples, the sides of the nose, the cheekbones, the cupid's bow, the eye sockets, and the jawline. If the neck is visible, darkening around the clavical and collar bones will also sell the illusion. Couple these dark contours with bright highlights on the cheekbones, the center of the forhead, around the edges of the temples, on the bridge of the nose, and right along the jaw. The sharper the contrasts, the more starved the performer will appear.
Additionally, consider removing some color from the face. Avoid using blush or natural lipstick colors. Place foundation over the lips to hide the performer's natural lip coloration. Consider setting the makeup with non-translucent powder, such as ash setting powder. This will make the character appear more malnourished.

Old Age Techniques
What if you have elderly characters in your production? How do you make young actors appear older? As with starvation, the key is to contour and highlight appropriately. Have your performer scrunch their face in various positions to find their natural wrinkles. In the creases of the wrinkles, draw dark, thick contour lines. While some blending is acceptable, you do not want to blend the countour out too much or you will lose the visual effect of the contrast. Also consider contouring the hands; this will make the performer's appearance more cohesive.
Once you have contoured successfully, surround the countours with highlights. These highlights should also be quite thick and unblended. Make sure to put highlights beside the contour lines to create a sharp contrast.
If the performer will be close to the audience, then a subtler approach may be acceptable. Adding spots, discoloration, and pseudo-texture to the skin can also create the illusion of old age. Ben Nye has an Age Stipple Wheel (CK-7) and an Age Effects Wheel (CK-8) to help with texture application. Compile various photos of individuals with similar ages, professions, and complexions to the character you are attempting to create. Reference photos are always important to have.
Facial Hair Techniques
Does a character need a beard or mustache in a pinch? Are there no quick-stick beards or mustaches readily available? Have no fear! There are two quick ways to emulate facial hair in a flash. The first is by using creme paint and a stipple sponge. Find a creme paint color that matches the character's hair. Then, dip your stipple sponge in the paint. Drag the stipple sponge along the skin in the direction of the hair growth. Consider layering multiple colors to make the hair's appearance more realistic. Then, set the creme paint with a powder. This will create the illusion of hair. However, it is important to note that this type of facial hair application is best for replicating short facial hair. If a character is intended to have a bushy beard, the individual should either attempt to grow a beard before the production or a beard prosthetic should be obtained.
Additionally, this method can be similarly performed with water-activated makeup. However, before the paint is applied, the performer should ensure their face is dry, powdered, and set with setting spray or hairspray. Then, the paint should be applied with a stipple sponge or fan brush. Unlike the creme makeup, the water-activated makeup will not layer as aesthetically. It is better for black or brown hair colors. Once completed, it may be optionally sealed in with hairspray or setting spray. The benefit of using this method is that water-activated paint can be applied and removed quickly. If this character engages in many quick changes, then water-activated facial hair may be the best solution. However, it is worth noting that water-activated paint smudges easily and may run if the performer begins sweating. It is always a good idea to test this style of makeup on the performer prior to opening night because alternative solutions may be required.
Injury Techniques
Perhaps a character is in a gruesome accident. They will have injuries and possibly be covered in blood. How do we create these effects on stage? There are several methods. The first is to create injuries using liquid latex. This can be done directly on the skin or by mixing liquid latex with flour, molding it into the shape of a wound, letting it dry, and applying it to the skin with another adhesive product. Latex prosthetics can also be purchased at a variety of retailers. These include wounds, burns, boils, and other unique shapes. It is important to note, however, that latex allergies are quite common, and latex applied directly to the skin, especially if improperly removed, can be damaging. So, it is crucial to always patch test products before committing to them for the production.
Another option is to use Synwax. Synwax is a synthetic wax that can be applied to the skin and molded to resemble wounds. The benefit of Synwax is that it is flexible, so it is an excellent material for wounds on mobile areas of the skin. Synwax, however, can be very tricky to use. It is important to practice using Synwax and determining how to ensure it adheres successfully on the performer's skin.
Once the wound is applied to the skin, a number of paints and powders can be applied on top of it. See the section above on bruising techniques for more information. Stage blood can also be obtained either in liquid or congealed form and applied to the skin and wound. Be cautious when using or making stage blood. It has the potential to stain skin, hair, and clothes. Always test stage blood's staining properties before putting it on the performer.
